

Imagine someone gives you one of those big, 7Oz chocolate bar, and even though you are grateful, you are not going to be eating that much chocolate all at once, right?… right?
Well, luckily you can break away smaller squares off of the bar and eat them one at the time, and that is exactly what you do, until 30 minutes later there is no more chocolate bar… well, you tried.
Think of the chocolate bar in the previous analogy, as a big network space which we need to break into smaller, more manageable pieces… I mean networks, we can accomplish this with subnetting.
Subnetting is the process of breaking or dividing a network space, into smaller, more manageable network spaces.
Think about the following scenario; You are in charge of a network that allows a total of 252 users (192.168.10.0/24), but the company has a total of 106 employees; 4 in HR, 4 in Accounting, 2 in Legal, 11 in IT, 55 in Sales and 30 in the Warehouse.
You need to create subnets that would allow for these number of users and prevent the waste of IP addresses as much as possible.
Without subnetting, you would only have one network and you would need to add all of these employees, as well as any new employee, to this same network. With subnetting, we can divide the available network space -252 users- into smaller networks that would accommodate all employees by department, and leave enough network room for future grow.
Even though we will cover some practice, this article is going to be mainly about subnetting theory. We are gong to talk about things like the anatomy of an IP address, Classfull and Classless addressing, the binary system and binary/decimal conversion and every topic involved in subnetting. We will cover the practice and do plenty of exercises and apply all we’ve learned, in the next article.
Also, before we get started, I want you to keep in mind that IP addresses and subnet masks -which we’ll talk about just ahead- are strings of 1s and 0s, binary strings, not decimal numbers. Remember that computers and network equipment in general, do not understand decimal, only we do.
To get started we need to have a basic understanding of what an IP address is, so let’s talk about the anatomy of an IP address to begin our journey. Let’s go.
Basic IP Address Anatomy.
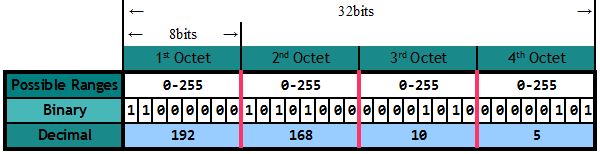
An IP address identifies a device (called a Host) on an IP network, and as detailed in the picture above, it is logically divided into 4 fields called octets. Each octet has 8 bits, making an IPv4 address 32 bits long, in total.
We’ll get into the binary details later, for now let me tell you that with 8 bits, we can have a total of 256 different addresses, that is 0 through 255. So, if we take the IP address in the picture, the first IP address would be 192.168.10.0, and the last possible IP address is 192.168.10.255. The IP address in this example, 192.168.10.5, is the 5th address in the range.
Also, an IP address is considered to be one of two IP address types, that is Classfull or Classless. Let’s start with Classfull addresses first.
Classfull Addressing.
Besides being either Classfull or Classless, an IP address, as determine by the value of its first octet (we will talk about this next), will also belong to one of three specific range of addresses call Classes. The classes are; class A, B and C… well, there are actually five classes not three, but the other two, class D for Multi-cast and class E for experimental, have very specific uses and cannot be subnetted, so we’ll skipped them.
Each one of the three classes have a default network mask: (A) 255.0.0.0, (B) 255.255.0.0 and (C) 255.255.255.0 (we’ll also talk about masks soon), and for an IP address to be classfull, it must have one of these three default network mask.
In other words, depending on the value of its first octet, the address will be determine to be either class A, B or C, but what determines an address to be classfull or classless, is the mask.
The following table shows the three classes mentioned above, their ranges, default network masks and usable number of hosts available in each class:
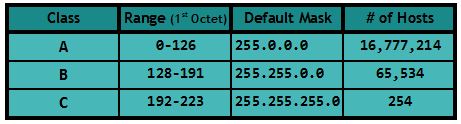
As an example, and following the table above, if the first octet on an IP address is, say, 125, it is a class A address. If the first octet is 169, it is a class B address, and if the first octet is 193, it is a class C address. Simple, so far.
Network Space.
Before we move on, I want to talk briefly about the network space, which is the number of hosts available in each network class. After all, we are going to be dividing these spaces into smaller networks when we get to the subnetting.
Through out this article, we are going to be using a class C address as an example, so I will explain why a class C network has 254 usable addresses out of a total of 256 addresses, but please note that the same explanation also applies for a class A or B or any network space for that matter.
OK, we will talk about network masks in detail just ahead, but to understand this now, you need to know at least, that a mask is a string of 32 1s and 0s just like an IP address, like the class C default mask shown below:

And you also need to know that the continuous 1s in a mask represent the network and the continuous 0s represent the hosts. So, the more 1s there are, the more networks we can have, and the more 0s there are, the more hosts we can have. That’s it… for now.
To find out how many usable address are there in a network space, we need to look at the hosts part of the network mask, this means that we need to count the number of 0s, and apply the following formula:
Formula: 
N, is the number of 0s on the hosts part of the address and in this case, there are 8 zeros, then:
Total IP addresses: 
So the total number of addresses on a class C network is 256, however, in an IP network, there are two addresses that cannot be assigned to any hosts, those address are the Network ID and the Broadcast, which are always the first and last IP addresses of the range. This is why we have to subtract 2 from the total number of addresses, to get the number of usable addresses:
Total Usable Addresses: 
As you can see, we have a total of 254 usable hosts in a classfull C network.
If you apply this formula to the other two network classes (or to any network space for that matter), you’ll come up with the number of total usable IP addresses.
OK, now that I got that off of my chest, let’s see what this Network Mask is all about.
The Network Mask.
You know that an IP address identifies a host on an IP network, what you might not know or realize, is that part of it also identifies the actual network to which that particular host belongs. This is because an IP address is logically divided into two distinct parts; the 1st part identifies the network (this part is called the prefix) and the 2nd part identifies the hosts on the network.
So, by this last statement, we can come to the conclusion that addresses within the same network will share the same prefix (network part), however, because each host within a single network must have different IP addresses, each IP address will have a different host part.
However, we cannot tell where the network part ends and the host part begins, just by looking at an IP address alone. I mean, if I show you an IP address, say 172.16.43.29 (by the way, can you tell what class of IP address is this?) and ask you “What part is is the Network and what part is the Host?”… you will just look at the address while scratching your head, right?
Well, don’t worry, not even “Mr. Cisco” will be able to answer this question by just looking at the IP address alone. That’s because there is nothing in the address itself that tells us which part is which. In order to differentiate the network from the hosts, we’ll need to inspect something called the Network Mask. These mask tells us to what network this IP address belongs and also to what host, and we’ll see how it does it just ahead.
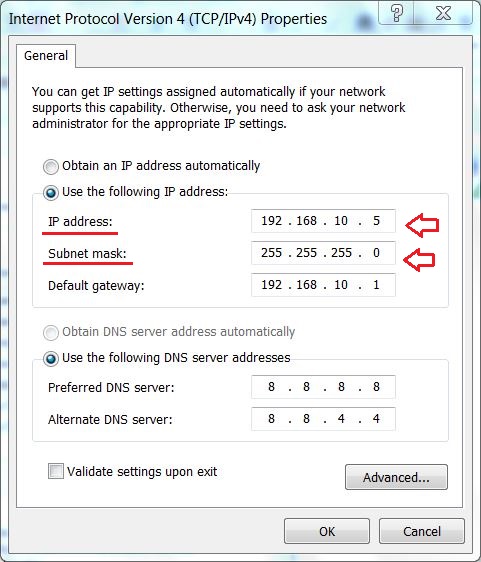
If you ever played around with your internet settings, you might have seen a network mask of 255.255.255.0, because this mask is the most popular mask for a home setup.
Mask Representation.
Before we get deeper into masks, let’s learn about the three different ways we can represent (write) a network mask, so we can recognize it when we see one:
- Binary:
- The mask can be represented in its true format, which is a 32bits string of 1s and 0s but, unlike the IP address, the 1s and 0s in a mask follow specific rules:
- There cannot be interleaving 1s and 0s.
- 1s are on the left.
- 0s are on the right.
- Invalid binary mask notations.
- 11101011 10001101 00100001 01011111
- 00000000 00000000 00000000 11111111
- Valid binary mask notations.
- 11111111 00000000 00000000 00000000 ← Class A
- 11111111 11111111 00000000 00000000 ← Class B
- 11111111 11111111 11111111 00000000 ← Class C
- 11111111 11111111 11111111 11100000 ← Classless (Subnetted)
- The mask can be represented in its true format, which is a 32bits string of 1s and 0s but, unlike the IP address, the 1s and 0s in a mask follow specific rules:
- Dotted-Decimal Notation.
This is the most common way to express a mask, it’s the one that we will see the most because it is what we, as humans, can easily understand.
In DDN, each octet is converted to its decimal value, separated by periods:- 255.0.0.0 ← Class A
- 255.255.0.0 ← Class B
- 255.255.255.0 ← Class C
- 255.255.255.224 ← Classless (Subnetted)
- Classless Inter-Domain Routing (CIDR) Notation.
This third format is very popular because it tells us not only the mask, but the actual IP address as well. This is why we mostly see this notation in books and it is very useful when we just need to write down the IP and mask.
It is also known as Slash Notation, Slashed Mask and a few others, in any case, it’s easily recognized because it will have a slash (/).
We just need to count the number of 1s on the binary prefix, and write the number after the IP address with a slash:- 11111111 00000000 00000000 00000000, so 10.1.1.2/8 ← Class A
- 11111111 11111111 00000000 00000000, so 172.29.1.3/16 ← Class B
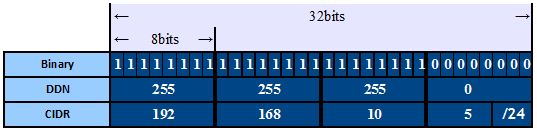
- 11111111 11111111 11111111 00000000, so 192.168.10.5/24 ← Class C
- 11111111 11111111 11111111 11100000, so 192.168.10.5/27 ← Classless (Subnetted)
Here we see all three notations together:
Now we know about the different ways to read and write a network mask, let’s start talking about what it does and most importantly, how.
Look very closely at both the IP address and network mask in the picture bellow, it tells us that the host with IP address 192.168.10.5 (and also 192.168.10.1 for that matter) belongs to network 192.168.10.0, let’s find out why that is:
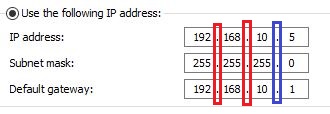
In order to aid our visualization, I’ve drawn lines between the octets to form imaginary columns. Notice that, just like the IP address, the subnet mask is divided into 4 octets; the first octet in the subnet mask (255), corresponds to the first octet (192) in the IP addresses. The second octet on the mask (also 255) corresponds to the second octet on the IPs (168), and so on.
If we look carefully, we’ll realize that the values on each octet of both IP addresses (IP and Gateway) are the same where the value of the subnet mask is 255 (in this case, the first 3 octets, 192.168.10), and they differ where the value of the subnet mask is 0 (.5 and .1). This is because these two addresses belong to two different host on the same network, one identifies to the PC and the other the router. If you think about this for a moment, surely you’ll come to the conclusion that the 255s represent the network part of this IP address, and the 0 represents the hosts.
Also note, in case that it is not obvious, that the network/host boundary (represented by the green line in the picture below) on a classfull IP address, will fall exactly on either of the classes (A, B or C) boundaries. For example, in the IP address we used, the network/hosts boundary falls in the class C boundary.

In other words, in classfull addressing, the network/hosts boundary will always fall in the same place as the class boundary, this is NOT the case in classless subnetting.
OK, slowly but surely, we are getting closer to the actual subnetting. This means that we are going to be creating smaller networks out of a classfull network (called Sub-networks). We can also say that we are going to divide a classfull network into smaller sub-networks. But in order to do this, first we need to take a quick look at the Binary numeric system, let’s do that now.
The Binary System.
At the beginning of the article I asked you to keep in mind that IP address and masks were actually strings of 1s and 0s, well, this is where the binary system comes in place.
The binary numeric system, as you might have noticed, has only two digits; 0 and 1. It is a base-2 system (0 to 1), where decimal is a base-10 system (0 to 9).
The main objective when it comes to binary, regarding subnetting, is to learn how to do binary/decimal conversion, and in order to convert from binary to decimal and vice versa, we use “place values”. These places start at a value of 1 (in decimal), from right to left, and each place value doubles the previous value (Power of 2), like this:

Notice that there is one place value for each binary digit, starting on the far right with a value of 1, and they keep doubling the previous value -from right to left-, as we mentioned. All we need to do to convert to decimal, is add the place values where the binary digit is 1. Think about the digit 1, as a “switch” that turns “on” the place value so it can be added.
This means that, for the example in the picture above, we need to add the values 1, 4 and 64:
![]()
so, the Binary number shown in this example above is decimal 69.
Please note that the binary number for 69 is 1000101 and not 001000101. The 0s after the highest place value (64 in this example) are omitted.
Here we have a few more examples:

Decimal value is 260.

Decimal value is 255.
Now, please keep in mind that the examples above show you how to convert numbers of any value. The place values will keep doubling as much as needed, as indicated by the three dots at the end, on the left side.
For example, if you want to convert a big number such as 769 for example, you would need to add another place value, the 512 place value, next to the 256 to be exact. This is because, in binary, the bigger the number, the longer the binary string.
This means that you will need 10 bits to come up with the binary equivalent of 769, like this:

Decimal value is 769.
However, remember that IP addresses (masks included) are divided into 4 octets of only 8 bits each, so to convert each octet’s values, you need to use something like this:

OK, so far we’ve learned about the anatomy of an IP address, we know how to figure out the total number of hosts, we can differentiate the network and the host part of a classfull IP address by looking at the mask and we know how to convert from decimal to binary and vice versa. However, from now on things get a bit more complicated (not too much though) because we’ll start looking at classless addresses.
Classless Addressing.
First, let’s start defining a classless address, by differentiating it from a classfull address. We said that a classfull address was an IP address that falls within one of three specific range of addresses -as indicated by the value of its first octet-, and that their respective masks are 255.0.0.0, 255.255.0.0 and 255.255.255.0, right?
Now, simply put, a classless address is one that does not follow the classfull rules we talked about before, like this:

If we look at the picture above and we examine the IP address alone, we realize that this is a class C address, because its first octet falls between 192 and 223, so the address is still considered to be a class C address. But look at the mask, it is not 255.255.255.0 as it should be for a class C address, its last octet is not 0, it is 128 because it has been subnetted, so we say that this is a classless address. It is still considered a class C address but it is no longer a classfull address because it does not have a classfull mask.
OK, just in case this generates a certain amount of confusion, let me simplify it like this; An IP address will always fall within one of the three classes, depending on the value of its first octet. This means that an IP address will always be considered to be either a class A, B or C address, but if the mask is not the default for the class, it indicates that the address has been subnetted and therefor it ceased to be a classfull address to become a classless address.
We can further simplify it like this; An IP address is determine to be of a certain class depending on the value of its first octet, but it will be determine to be either classfull or classless, depending on its mask.
And yet another simpler definition; a classless address is a subnetted, classfull address… this should be clear now. :O)
Great, so now we know what a classless address is, and we know that what makes this particular address in our example a classless address, is the fact that the mask is not a classfull mask because it has a 128 on its last octet.
In case it is not obvious just yet, let’s see why the last octet is 128. Let’s apply our basic binary knowledge.
The Subnetted Mask.
The picture bellow shows both the classfull mask (A), and also the subnetted mask (B) which has a 128 on its last octet.

In the first example (A), the 1st, 2nd and 3rd octets are 255s because each octet has eight 1s, but the last octet has only 0s, and as we learned before, binary 0 is equal to decimal 0, so the value for the last octet on example A is, well… 0, making this a classfull mask.
But when we look at the second example (B), we can see that the last octet now has a 1 on its first bit instead of a 0, and there is no longer a total of 24 1s, like in example A, but instead there are 25 1s total. The network prefix has been “extended” because we borrowed a host bit and turned it into a network bit (When we take hosts bits and turn them into network bits, it is called borrowing), and look at the place value of that 1 we just borrowed, it is 128, isn’t it?…
The fact that the 1 we borrowed its on the 128 place value and the octet’s value is also 128, is a just coincidence. If we would’ve borrowed two host bits (that is, the 128 and 64 place values for a total of 26 1s), the octet’s value would’ve been 192, not 128. And if we keep borrowing host bits, the octet’s value would’ve been; 224, then 240, then 248, then 252 and then 254 (if it is 0 or 255, it has not been subnetted).
Notice also, that the more host bits we borrow, the more networks we can have, but with less number of hosts.
We’ll start talking about the math involved in subnetting and do exercises next, but believe it or not, we just subnetted an IPv4 address. Just by changing the value of a single bit on the mask from 0 to 1, we took a class C address with a default mask of 255.255.255.0 -which allows for just one network with a total of 256 addresses-, and split it into two networks with a total of 128 addresses each. We effectively divided the network in half, let’s see why that is.
Subnetting.
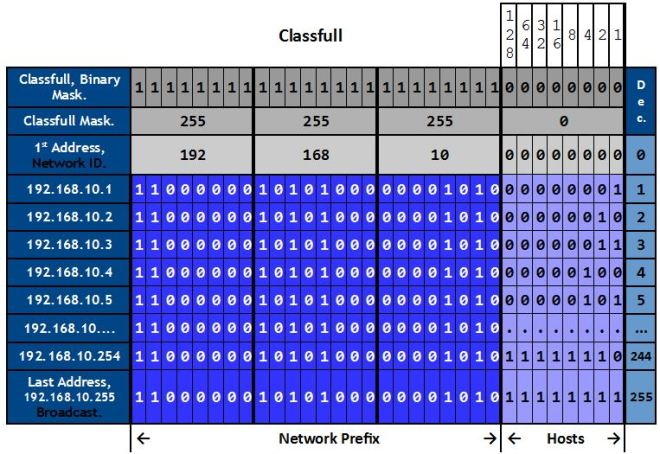
In the picture below, I’ve converted both the IP address and the mask to binary:
IP Address: 192.168.10.5 Subnet Mask: 255.255.255.0

We know that the IP address never changes where the mask is 1 because that is the network part of the address, we can safely predict then, that the first three octets on this IP address will not change, they will remain 192.168.10 through out the entire network. So we can determine that 192.168.10.0 identifies the network, it is the Network ID, because it is the first address of the range (the last address, 192.168.10.255, is the broadcast).
This means, in case it is not clear, that the IP addresses of every host on this network will start with 192.168.10. The only part that can and will change on each and every device in this network, is the host part (the 0s on the 4th octet) which identifies individual hosts. In this case there are a total of 8 bits that we can use for our hosts and, as we learned before, 8 bits allows for a total of 256 addresses (254 usable, remember that we cannot assign the first and last addresses to any hosts).
Let’s break this information down:
Now, before we move on, I will show you a VERY important concept of the subnetting process. This is the key to understanding subnetting, and it goes like this; The very last network bit (in this case, the 1st bit on the 4th octet marked in red, on the picture below) will give you two, VERY important pieces of information required for subnetting, that is the “Interesting Octet” and the network “Increment”.
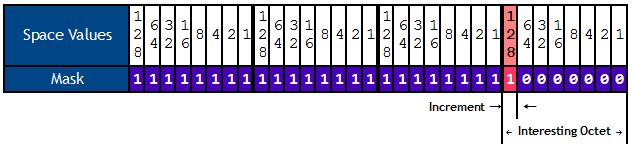
- Interesting Octet: the octet from which we borrowed bits, which in our example is the 4th octet. It tells you where (on which octet) the subnetting will take place.
- Increment: the place value of the last borrowed bit, in our example is the 128 place value of the 4th octet, because we’ve only borrowed one bit. This tells you where the network begins and where it ends.
Following our example, the increment is 128, so the 1st network goes from 0 to 127, that is 128 total addresses.
Perhaps, the most important concept out of these two, is the “increment”, so let me further explain. The increment is very important because it tells us what will be the new (subnetted) network sizes.
And there is no magic here, it is very simple actually. If we need to borrow just 1 host bit (like we did), it will be the 128 place value because we cannot have interleaving 1s and 0s remember? So we cannot borrow the 64 bit and not the 128, for example. If we need to borrow two bits, it will be the 128 and the 64, the increment would be 64 and there would be 26 1s in a row, and so on.
In this case, we are working with a class C network space, so we have a total of 256 address to work with, this is the network space we are going to divide into smaller networks.
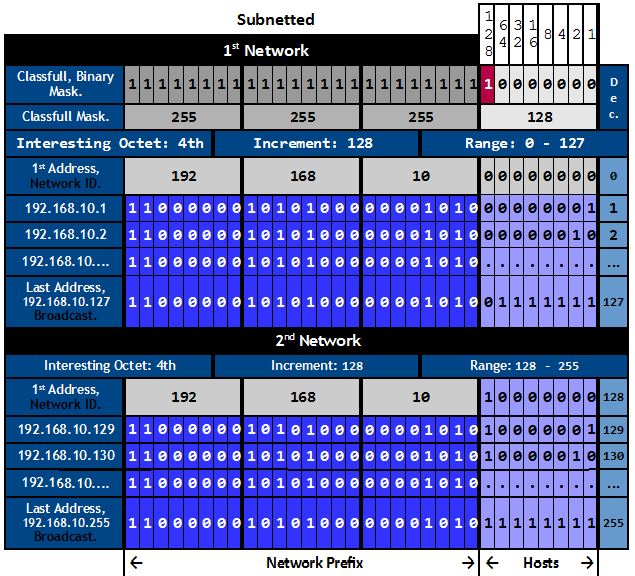
As we’ve seen, we only borrowed 1 bit, the 128 bit, and this indicates that we are going to divide the network in increments of 128, starting (always) from the very first, classfull address in the range, which in this example it is 192.168.10.0, so our first network goes from 0 to 127 on the interesting octet, and the second network goes from 128 to 255.
The new, subnetted networks look like this:

Notice that we effectively divided the network in two, that’s because we have a total of 256 address and the increment is telling us that the new network size is 128 hosts, so… what is 256 divided by 2?… Haaaaa-llelujah! :O)
To make the point about the increment and its function, very clear, let’s see an example with 2 borrowed bits.
In this example, the mask will be 255.255.255.192, the number of consecutive 1s will be 26, the increment will be 64, the number of networks will be 4 and the interesting octet will still be the 4th octet, so:
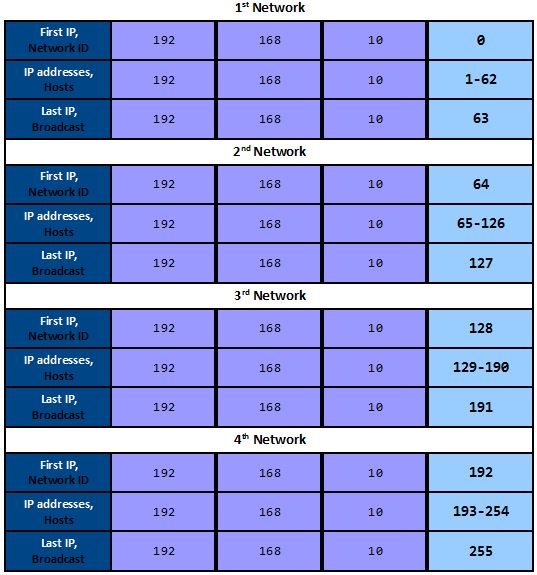
Notice that we now have 4 network, but each network has less available addresses then before, 128 before, 64 now.
This proves what we said earlier that the more network bits we have, the more networks we can have but the less users in each network.
Now, let’s take as much time as we need to make as much sense as we can from the picture below, as everything we’ve learned so far, is shown in it.
Ok, we’ve reached the end of this article in which we’ve covered subnetting theory. The next article it’s going to be all about applying this theory. We’ll do exercises with scenarios, including the scenario I talked about at the beginning of the article and other scenarios as well. We will learn that there are two main way to approach a subnetting scenario; we can subnet for a specific number of networks or a specific number of hosts and we’ll also talk about Variable Length Subnet Mask (VLSM) and what is it used for.
Until then, make sure you understand the theory on subnetting… you’ll need it.


Awesome…Excellent !!
LikeLike
Sir, I want to know about VLSM?
LikeLike
Hi Omkar,
Thanks for reaching out. VLSM is on the works! It should be ready tomorrow or Thursday. If you want, you can follow this blog, and an email will be sent to you when the article is posted.
Thanks again.
LikeLike
Super-Duper website! I am loving it!! Will be back later to read some more. I am bookmarking your feeds also.
LikeLike
There’s noticeably a bundle to learn about this. I assume you made certain good factors in options also.
LikeLike